76 Most Useful Adobe Photoshop Keyboard Shortcuts
Adobe Photoshop is one of the most powerful design and graphics programs available, but it can be tricky to learn all the tips and tricks that make your editing tasks easier and faster. That’s why knowing Adobe Photoshop keyboard shortcuts is essential! Keyboard shortcuts allow you to bypass endless clicks and menu navigation, streamlining your workflow so you can get more work done in less time.
Instead of memorizing all the necessary Photoshop shortcut keyboards, you can save this article and use it as a cheat sheet whenever needed. Keep in mind that in most cases shortcuts for Windows and Mac users are the same. But in some cases, they can be different. If they are, the article will list both variations. The one for macOS will be displayed in parentheses.
Also, make sure to check our articles on the best Word keyboard shortcuts and the best Excel keyboard shortcuts for a complete boost in productivity.
Preparing Your Work
Before you start working in Photoshop, you might want to prepare the image or the canvas. This will help you enhance your workflow. Preparing a Photoshop document should be second nature to you if you often use the software, but using keyboard shortcuts saves time. Instead of wasting time finding the right tools, press a few buttons on your keyboard to change image size, zoom in or out, and scale your image. Here are the most basic shortcuts that’ll help you prepare your work in Photoshop:
| Preparing Your Work | ||
| Action | Windows | macOS |
| Change Image Size | CTRL + Alt + i | Command + Option + i |
| Change Canvas Size | CTRL + Alt + c | Command + Option + c |
| Zoom In | CTRL + + | Command + + |
| Zoom Out | CTRL + – | Command + – |
| Scale Proportionately | Hold Shift while selecting an object | |
| Scale in Place | Hold shift + alt (option) while selecting an object | |
| Show Rulers | CTRL + r | Command + r |
| Show/Hide the Grid | CTRL + ‘ | Command + ‘ |
Selecting Tools
The tools with which you work in Photoshop come in groups. Each tool group has different functions. For example, under the Object Selection group, you’ll have options to make a quick selection, or to use a magic wand tool.
Each tool has a keyboard shortcut, and here’s the list of the most commonly used ones:
| Selecting Tools | |||||
| Move tool |
v | Path Selection tool Direct Selection tool |
a | ||
| Object Selection tool Quick Selection tool |
w | Hand tool | h | ||
| Rectangular Marquee tool Elliptical Marquee Tool |
m | Rotate View | r | ||
| Lasso tool Polygonal Lasso tool |
l | Pen tool Freeform Pen tool |
p | ||
| Eyedropper tool Color Sampler tool |
i | Clone Stamp tool Pattern Stamp tool |
s | ||
| Crop tool Perspective Crop tool |
c | Dodge tool Burn tool |
o | ||
| Eraser tool Background Eraser tool |
e | Zoom Tool |
z | ||
| Rectangle Rounded Rectangle |
u | Default Foreground/Background colors |
d | ||
| Horizontal Type tool Vertical Type tool |
t | Switch Foreground/Background colors | x | ||
| Brush tool Pencil tool |
b | Toggle Quick Mask Modes | q | ||
| History Brush tool Art history Brush tool |
y | Change Screen Mode | f | ||
| Spot Healing Brush tool Healing Brush tool |
j | ||||
| Gradient tool Paint Bucket tool |
g |
Note: These quick shortcuts are the same for Windows and macOS users.
The Brush Tool
The brush is one of the most commonly used tools in Adobe Photoshop for obvious reasons.
Use these shortcuts to change the brush size, shape, and transparency of the brush strokes.
| The Brush Tool | |
| Increase size | ] |
| Decrease size | [ |
| Increase brush hardness | } |
| Decrease brush hardness | { |
| Select previous or next brush style | , or . |
| Display precise crosshair for brushes | Capslock Also Shift + Capslock |
| Toggle airbrush option | Shift + Alt + p (Shift + Option + p on Mac) |
The Marquee Tool
Making quick and simple selections in Photoshop is easy. But the Marquee tool is capable of so much more than a simple drag and select. Use it to select individual elements in your image or the entire graphic. After making a proper selection you can easily copy, cut, and paste it into another place, document, or even layer.
Here are some of the commonly used Marquee tool shortcuts. But first, press M on your keyboard to select the tool.
| The Marquee Tool | ||
| Windows | macOS | |
| Toggle between Slice Tool and Slice Selection Tool | CTRL | Command |
| Draw square slice | Shift + drag mouse | Shift + drag mouse |
| Draw from center outwards | Alt + drag mouse | Option + drag mouse |
| Draw square slice from center outwards | Shift + Alt + drag mouse | Shift + Option + drag mouse |
| Reposition the slice while creating it | Spacebar + drag mouse | Spacebar + drag mouse |
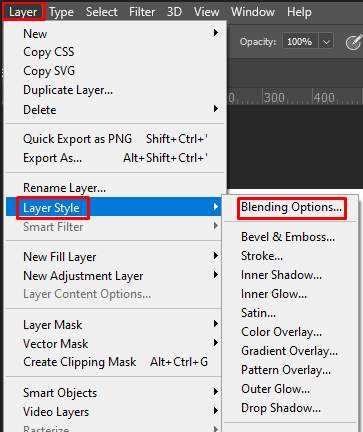
Blending Options
Blending modes will improve the looks of your graphics or image you are working on. They determine how the colors blend between the layers. Some of the blending options make subtle changes, while others can drastically change the visual impression of your graphics.
To select the blending option go to Photoshop’s top bar menu and select Layer > Layer Style > Blending Options.
Alternatively, you can double-click any layer and that will bring up the options for that particular layer. You’ll find blending options there.
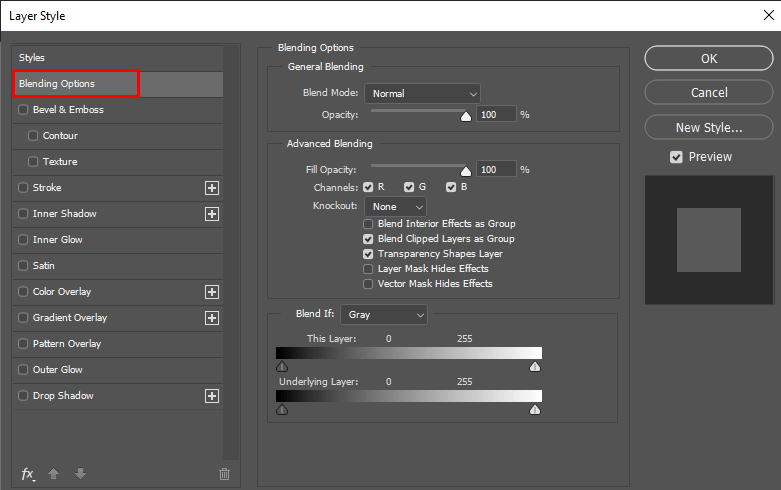
Once you open the blending options, you can use the following shortcuts. But don’t forget to first select the move tool (v) and then click on the layer you want to manipulate with blending options.
| Blending Options | ||
| Windows | macOS | |
| Toggle different blending modes | Shift + + and Shift + – | Shift + + and Shift + – |
| Normal mode | Shift + Alt + n | Shift + Option + n |
| Dissolve | Shift + Alt + i | Shift + Option + i |
| Darken | Shift + Alt + k | Shift + Option + k |
| Lighten | Shift + Alt + g | Shift + Option + g |
| Multiply | Shift + Alt + m | Shift + Option + m |
| Overlay | Shift + Alt + o | Shift + Option + o |
| Hue | Shift + Alt + u | Shift + Option + u |
| Saturation | Shift + Alt + t | Shift + Option + t |
| Luminosity | Shift + Alt + y | Shift + Option + y |
Working with Layers and Objects
Manipulating certain objects in your graph, or even multiple layers can be daunting work. But these shortcuts make it all seem so easy. These are also some of the most commonly used shortcuts in Photoshop by both professionals and those who are just starting out.
| Manipulating Objects and Layers | ||
| Windows | macOS | |
| Select all objects | CTRL + a | Command + a |
| Deselect selected objects | CTRL + d | Command + d |
| Inverse the selection | Shift + CTRL + i | Shift + Command + i |
| Select all layers | CTRL + Alt + a | Command + Option + a |
| Merge all layers | CTRL + Shift + e | Command + Shift + e |
| Select top layer | Alt + . | Option + . |
| Select bottom layer | Alt + , | Option + , |
| Select next layer down or up | Alt + [ or ] | Option + [ or ] |
| Move target layer down or up | CTRL + [ or ] | Command + [ or ] |
| Move selected layer to the bottom or top | CTRL + Shift + [ or ] | Command + Shift + [ or ] |
| Create a new layer | Shift + CTRL + n | Shift + Command + n |
| New layer via copy | CTRL + j | Command + j |
| New Layer via cut | CTRL + Shift + J | Command + Option + j |
| Group selected layers | CTRL + g | Command + g |
| Ungroup selected layers | CTRL + Shift + g | Command + Shift + g |
| Merge and flatten selected layers | CTRL + e | Command + e |
| Merge selected layers on top of the other layers | Control + Shift + Alt + e | Command+ Shift+ Option + e |
| Free Transform objects | CTRL + t | Command + t |
| Undo last action | CTRL + z | Command +z |
| Undo multiple last actions | CTRL + Alt + z | Command + Option + Z |
Saving Your Photoshop Document
Finally, let’s see which shortcuts you can use to save your work in Photoshop. It won’t matter if you finished it or not. You can always return to your work if you save it as a Photoshop (PSD) file.
| Save your Photoshop Work | ||
| Windows | macOS | |
| Save as | CTRL + Shift + s | Command + Shift + s |
| Save for Web and Devices | CTRL + Shift + Alt + s | Command + Shift + Option + s |
Even if you’re a beginner at using this software, taking the time to learn and practice these important key commands can really pay off in significantly reducing the time it takes to adjust intricate images. Don’t worry if it takes time to remember a certain shortcut though – practice makes perfect!
Post a Comment